From DXF Pattern Files to a True-to-Spec 3D Garment: Grading, Materials and Manufacturing Data


Yes — DXF pattern files are the right starting point for a true-to-spec 3D garment, but the pattern pieces alone aren't enough. A DXF file only becomes a garment that fits and drapes correctly once it's paired with grading rules, material metadata and basic construction data. Without this information what you get is a shape wrapped around one size — not a garment that behaves like the real thing across the sizes you actually sell.
This is an important distinction when discussing virtual try-on. Having the original DXF patterns doesn't automatically mean that the digital garment will behave like the physical one, especially when multiple sizes are involved.
The shortcut most virtual try-on takes
Ask a vendor how their 3D garments are built, and a common answer, rarely stated this plainly, is that they model one reference size and scale it up or down for everything else. It's a fast way to populate a catalog. It's also not how garments actually work.
A size 8 dress and a size 18 dress in the same style are not the same shape at different volumes. Grading changes proportions: sleeve length grows differently than shoulder width, a bust dart shifts differently than a hem circumference, and the relationship between panels shifts unevenly across the size range. Uniform scaling of a single 3D model doesn’t reproduce those grading changes; it just makes the reference size bigger or smaller, which means every size except the one that was actually modelled deviates increasingly from the intended pattern, and the error grows the further a size sits from the reference.
It's also a claim you can check without insider knowledge. Ask any vendor to show the same garment at the smallest and largest size they support. If the proportions look identical at every size, just scaled up or down, that's a uniformly scaled reference model, not a graded one. It's one of the more reliable ways to tell which approach you're actually looking at.
The alternative is to build the 3D garment from the same data that already defines how that garment is cut and graded in the real world, which is what a DXF pattern file, done properly, already contains.
What's actually inside a DXF pattern file
DXF (Drawing Exchange Format) is a CAD file format, not one built specifically for apparel, but it's the near-universal export format across pattern-making software. It's how pattern data leaves almost every CAD or PLM system in use today. Gerber AccuMark, Lectra Modaris, Optitex, Assyst and Tukatech can all export to it, which is why it's the input we ask for rather than any proprietary format.
This CAD pattern file, for a single garment, typically carries:
Pattern pieces — every individual panel that makes up the garment: front, back, sleeve, collar, facing, pocket, and so on, each as a distinct outline.
Seam lines and seam allowance — where pieces are joined, and how much fabric sits outside the stitch line.
Notches and drill holes — the small marks that tell a cutter or sewer which edges align with which, and in what orientation.
Grainlines — the direction each piece should sit relative to the fabric's weave, which affects both cutting and how the piece behaves once sewn.
A base size — the pattern is drawn at one size, usually a sample or middle size in the range.
That base pattern is a precise description of a garment's shape — which is exactly why it's a better starting point for a 3D garment than a photograph or a manual re-modelling effort. But by itself, it only describes one size. Everything above the base size and everything below it depends on data that lives elsewhere.
Grading rules: the part that makes every size correct, not just one
Size grading is the process of deriving every other size in a range from that one base pattern — and it isn't proportional scaling. A grading rule set (sometimes shipped as separate .rule files, sometimes embedded in the CAD file itself) specifies, point by point around each pattern piece, exactly how much that point moves for each step up or down in size. A rule table might move the shoulder point 0.6 cm per size step while moving the hem point 1.2 cm, because that's how the style was actually designed to grow.
This is the piece of data that determines whether every size in a range is a genuine true-to-spec garment, or only true to spec at whichever size someone happened to model. Using the grading rules alongside the base pattern allows every size in the range to be built from the same construction logic the brand's own pattern-makers defined, not approximated afterward.
It's worth saying plainly why this is the differentiator it is: almost no public explanation of virtual try-on gets into grading rules at all. Most content in this space stays at the level of “we use AI to show you the garment.” Whether that garment is graded correctly, or scaled uniformly from a single reference size, is rarely addressed — because addressing it means being specific about a technical process that most vendors either haven't built properly or would rather not draw attention to.
Material metadata: what the garment is made of, not just its shape
A pattern, even a correctly graded one, is still a flat description of shape. It says nothing about how the fabric will actually behave once it's on a body — whether it clings, falls straight, stretches with movement, or holds structure. That's what material metadata supplies:
Fabric type and weight — a heavy denim and a lightweight jersey with an identical pattern will drape completely differently.
Stretch and recovery — how much the fabric extends under tension and how well it returns to shape, which matters most at stress points like a waistband or a fitted sleeve.
Colour and print — including placement, since a print or panel colour has to map correctly onto graded pattern pieces at every size, not just the sample size.
Trims and closures — buttons, zips, elastic, drawcords — details that affect both appearance and how the garment sits.
This is also where a garment's fit stops being purely geometric and starts being physical. A physics simulation stage needs fabric weight, stiffness and stretch as numeric inputs to calculate how a garment folds, stretches and settles once it's draped on a body in a given pose — geometry from the pattern tells the simulation what shape to start from; material metadata tells it how that shape behaves once gravity and movement are applied.
Cut-and-sew data: how flat pieces become a worn garment
The last piece is construction data — cut and sew data, in industry terms — essentially the same information that's already in a garment's tech pack. It defines how the individual pattern pieces actually come together: which seam on one panel joins which seam on another, the order of assembly, seam type, and any construction details that affect fit (a princess seam versus a dart, for instance, changes how a panel shapes to the body even when the outer silhouette looks similar).
Reconstructing a 3D garment from pattern pieces means, in effect, virtually sewing them — joining panels along their matched seam lines in the correct order, respecting seam allowance, so the resulting 3D shell reflects the same construction the garment would have on a cutting table. Skip this step and rely on shape approximation instead, and the reconstruction may look plausible from a distance while getting the actual construction wrong in ways that show up as fit errors once the garment is draped and simulated.
Putting it together: from files to a photorealistic try-on
Once a DXF pattern file, its grading rules and its material metadata are in hand, reconstruction follows a consistent sequence:
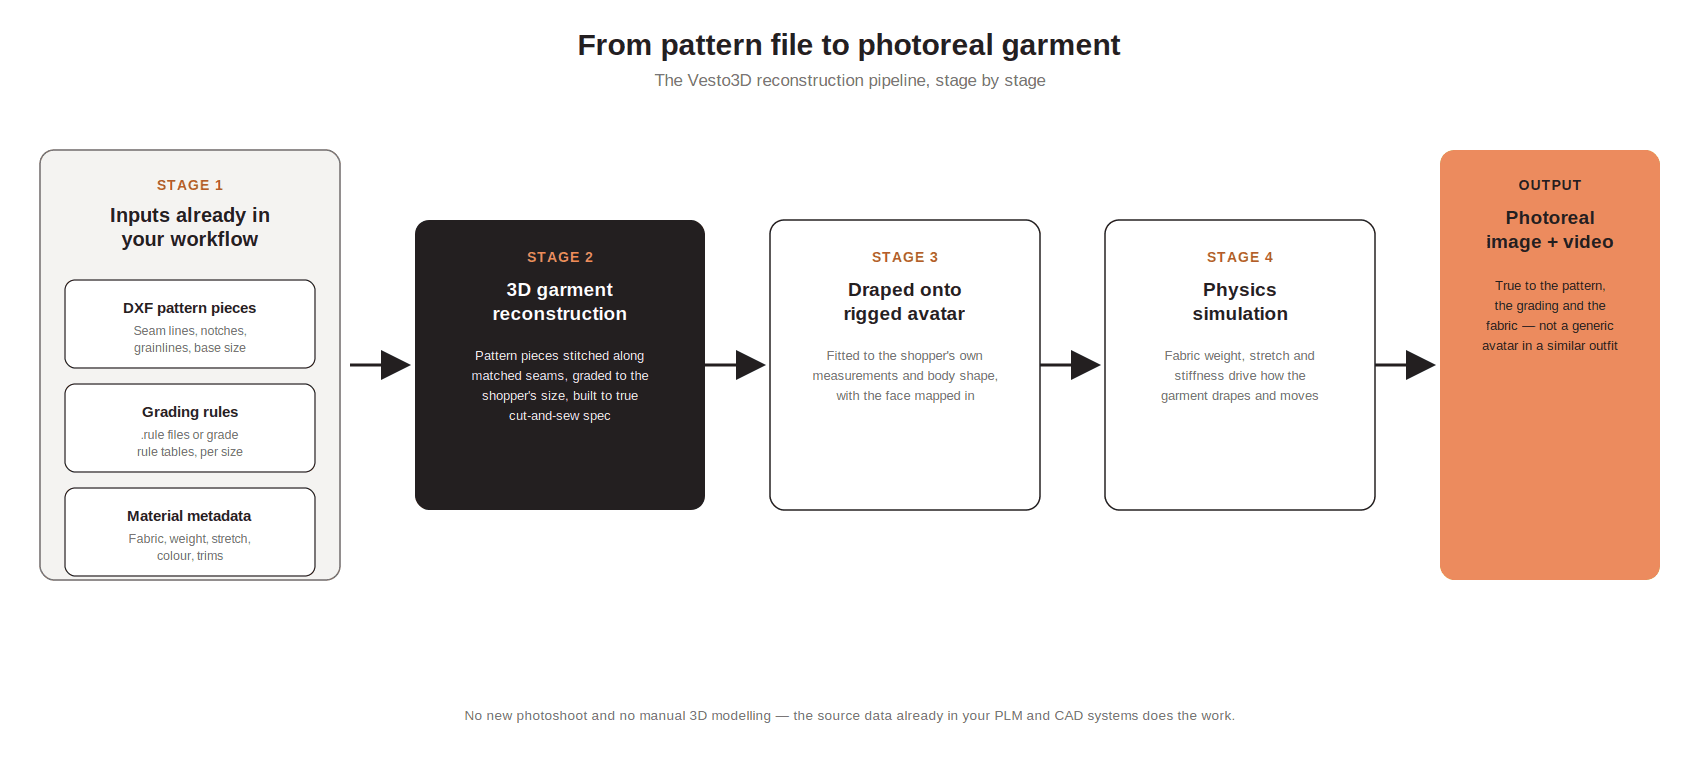
From pattern file to photoreal garment — the Vesto3D reconstruction pipeline, stage by stage.
The pattern pieces are assembled into a 3D garment at true-to-spec proportions for whichever size is being built, using the grading rules rather than a scaled reference shape. That garment is draped onto a rigged 3D avatar built to the shopper's own measurements, with a face mapped in so the result reads as a specific person rather than a generic model. From there, physics simulation — driven by the material metadata gathered earlier — determines how the garment actually falls, stretches and moves on that body. The simulated result is then passed through a photorealism pass to produce the final image and video a shopper sees.
Each stage depends on the one before it having real data to work with. A reconstruction built on a pattern alone, without grading, produces a garment that's only correct at one size. A reconstruction without material metadata has a shape to drape but nothing to tell the physics simulation how that shape should behave once it's on a moving body. The pipeline is only as accurate as the least complete input in it — which is precisely why the input data matters more here than the rendering technique that comes after it.
Do you already have this data?
For most brands with an existing pattern-making and grading process, the honest answer is yes. If patterns are built in Gerber AccuMark, Lectra, Optitex, Assyst, Tukatech or a comparable CAD/PLM system, the base pattern, the grading rule set and most of the material metadata already exist as part of the normal product development process — they were created to support cutting, grading and production, not virtual try-on, but the same files serve both purposes.
Onboarding a garment, in practice, means gathering what already exists rather than creating anything new:
The DXF pattern file for the base size.
The grading rule set — a .rule file, an embedded grade table, or a grading spec from the tech pack if the two haven't been kept together.
Material metadata — fabric composition, weight and stretch behaviour, which usually already sits in the tech pack or the fabric's own spec sheet, plus the colour and any print files.
Studio-quality product photography, where it exists, or source photography that can be brought up to studio quality — used alongside the pattern data to confirm colour, print placement and finish.
The most common gap isn't the pattern file itself — it's grading data and material metadata that exist somewhere in the organization but haven't historically been attached to the same file as the pattern. A grading rule set that lives in a separate spreadsheet, or fabric specs that live with a supplier rather than in the PLM system, still counts as data you have; it just needs to be gathered and paired with the pattern before reconstruction can use it. That gathering step, not new asset creation, is usually what onboarding a catalog actually involves.
Why this is the part that scales
None of this is a one-time technical curiosity; it's the reason DXF-driven reconstruction scales to a full catalog in a way that manual 3D modelling doesn't. A manual model has to be rebuilt, roughly from scratch, for every style and often for every size. A pipeline built on pattern, grading and material data reuses the same reconstruction logic across every garment that has those three inputs available, which is what makes it realistic to cover thousands of SKUs rather than a curated handful. It's also what makes accuracy something that can be tested and validated at every size in a range, rather than assumed from how convincing one hero size looks in a demo.
Getting this input data right is unglamorous compared to talking about AI-generated imagery — but it's the part that determines whether a virtual try-on actually shows a shopper the garment they'd receive, or a plausible-looking approximation of it. Send us a DXF file and grading table from your own line, and we'll show you what a true-to-spec reconstruction of it actually looks like, before you commit to anything.
Other articles
View All Articles